
If you have ever used Esri’s arcpy package or their Python API package, you may have observed that they are only available through the Python environment which is installed with ArcGIS Pro. These packages can’t be imported into “non-Esri” Python environments without having proper Esri licensing configured on the machine. That is to say, you can download and install Python, import arcpy or arcgis (the packages containing the ArcGIS Python API), but can’t execute most functions and methods from these packages script outside the ArcGIS ecosystem due to these packages’ built-in licensing checking restrictions. This has proven to be a difficulty for me over the years as a GIS developer, being locked into using Esri’s Python interpreter anytime an a script or application has a dependency on the arcpy or arcgis packages, and limiting the environments in which code can be executed.
With the introduction of ArcGIS Pro 1.3, Esri incorporated Conda, a package manager and environment management system, to the ArcGIS Pro Python environment. This allowed a little more flexibility with managing multiple ArcGIS Pro Python environments, allowing specific package configurations to be set in each environment, without introducing breaking changes to the Python environment used by Pro itself. Using Conda, cloned Python environments can be created in a location of your choosing, but with one “gotcha” – ArcGIS Pro must be installed on the target machine, and a user with an ArcGIS Pro license must be logged into the app. For a GIS developer’s local development machine, this isn’t too much of a problem; install ArcGIS Pro, log in, clone a Python environment, and use the python.exe interpreter from that environment in your preferred development tools. I have previously detailed how to do this with VS Code in my blog, and also have additional instructions for configuring your local development environment to use a cloned ArcGIS Pro Python environment in the README for the flask-demo repository.
If you’re developing ArcGIS Pro tools, a cloned Python environment on your development machine may be all you need. The users of your tools will also have ArcGIS Pro and its Python environment installed on their machine, and in most cases, should be able to execute those tools without issue. However, I recently ran into a new challenge: I wanted to learn Flask, a web application framework, and I also wanted to be able to use the arcpy and arcgis packages within my Flask app when deployed to a production server. I used this tutorial from Microsoft on building a simple Flask app using VS Code. The tutorial was easy to follow, but it assumes you are using a vanilla, or “non-Esri,” Python distribution. I was able to easily set my development environment to use my cloned ArcGIS Pro Python environment when working through the tutorial and import the arcpy and arcgis packages. However, I wanted to be able to use ArcPy and the ArcGIS Python API in my app not just when developing and running it locally, but also when the app is deployed to a server. I did some research and testing to figure out how to wire up an ArcGIS Pro Python environment to my Flask app so that the arcpy and arcgis packages could be imported and used in my code, and below I will detail the steps I followed to deploy my app to a Windows Server 2019 machine which is running IIS. This post will assume the reader is already somewhat familiar with Python & Flask, and won’t focus too much on the app structure and code itself; this post be will mainly be about how to deploy the app.
To get started, I created a sample Flask application which can be viewed in this repository. This was actually my first time exploring Flask, and I quite enjoyed it – Flask is pretty minimalistic and simple, allowing for rapid development, but it is also scalable, making it a popular framework for web applications of all sizes. My example app is very simple – inside app.py, I have a few REST endpoints, one of which is /hello which simply returns a message to the user indicating the app is running and responding to requests:

In addition to the /hello end point are the /checkArcPy and /checkArcGISPythonAPI endpoints which each call a function from the arcpy and arcgis packages respectively, indicating they were able to be imported and used in the app:

The code which defines the /checkArcPy endpoint looks like this, simply importing the arcpy package, and calling GetInstallInfo() which returns a dictionary containing information about the detected ArcGIS installation:
import arcpy

@appBlueprint.route("/checkArcPy", methods=["GET"])
def checkArcPy():
    try:
        ver = arcpy.GetInstallInfo()["Version"]
    except:
        response = {
            "message": "arcpy.GetInstallInfo() failed."
        }

        return jsonify(response)

    response = {
        "message": f'arcpy.GetInstallInfo()["Version"] output: {ver}'
    }

    return jsonify(response)
Once the application is running locally without error, it’s time to deploy to a web server so the API can be accessed via the internet by users. In this example, I will be using Windows Server 2019 which is running IIS v10. Like most organizations, you probably already a domain name bound to a website running under IIS; configuring that is beyond the scope of this tutorial. To begin, log into your server, and ensure ArcGIS Pro is installed. Covering that process is also out of scope for this post, but Esri details the installation process here. Note that the installation needs to be for all users, not just the currently signed in user. Once ArcGIS Pro is installed on the server, an ArcGIS user must log into ArcGIS Pro; this will insure the application is licensed, and the ArcPy and ArcGIS Pro Python API packages can be used once imported:

Ideally, you have logged into the server with and launched ArcGIS Pro under a service account from your organization – an account whose password does not expire after a few months, as is commonly configured for individual Active Directory accounts. This is important for a couple reasons, the first being that the account used to log into the server will also need to be used when configuring an application pool in IIS, which will be covered here in more detail below. If the password changes for the account used in this step, it will cause the Flask demo application to not be able to run in IIS. The second reason is related to a known ArcGIS Pro issue, where licensing may not be recognized by the Python environment if the username under which the Flask app is running has never opened and executed ArcGIS Pro.
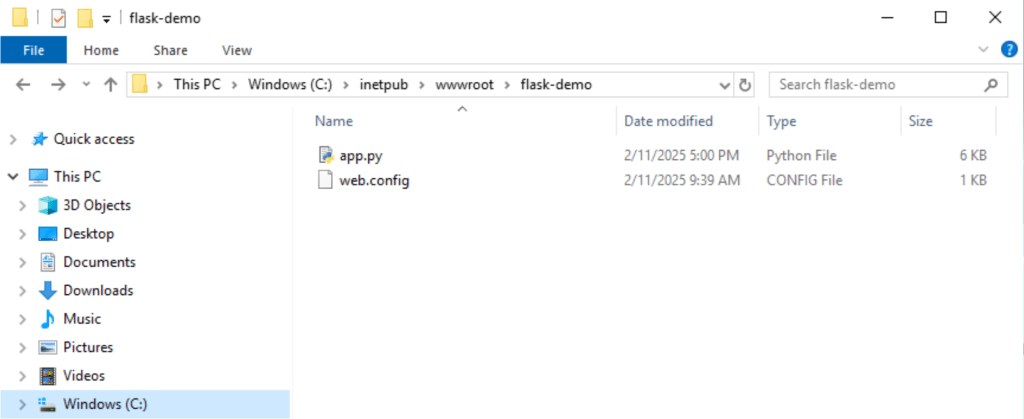
Once ArcGIS Pro is installed, copy the app code to the server. The default location for web apps running under IIS is C:\inetpub\wwwroot\ but can in a different folder or disk drive, depending on your organization’s server configuration. Inside the wwwroot folder (or wherever applications are hosted on your server), create a new folder named “flask-demo” and copy the app code to it. The app files needed from the flask-demo repository are “app.py” and “web.config”:
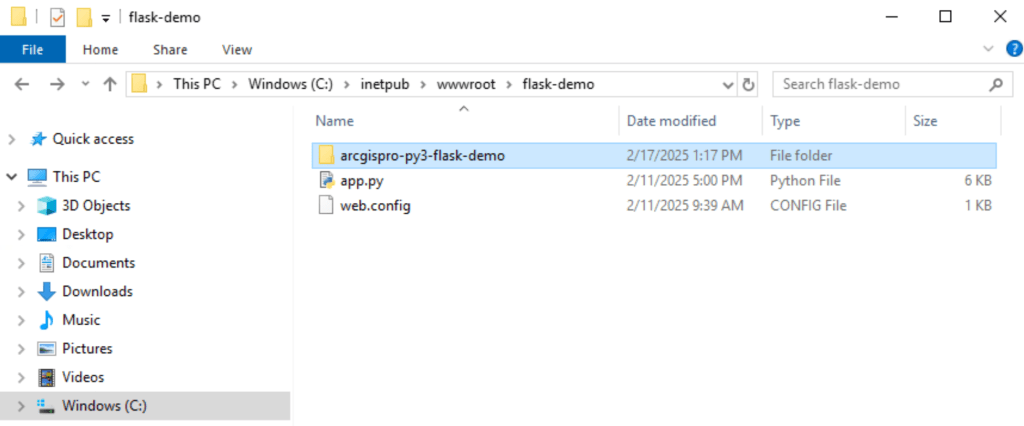
Once the app code is copied over, an ArcGIS Pro Python environment needs to be cloned. In ArcGIS Pro > Settings > Package Manager > and select the gear icon to open the environment manager. Clone the default “arcgispro-py3” environment, naming it “arcgispro-py3-flask-demo” and set the destination to to the “flask-demo” folder created above:

Once the environment clone is complete, you should see a new folder, containing the cloned Python environment, inside the “flask-demo” app folder, and inside the “arcgispro-py3-flask-demo” folder will be the python.exe interpreter:
The next step is to add a few dependencies to our cloned Python environment which are needed for our flask-demo app. Launch a command prompt window, and navigate to the “Scripts” folder inside the ArcGIS Pro installation location, typically found here: %ProgramFiles%\ArcGIS\Pro\bin\Python\Scripts\ and execute “proenv.bat” – If you do not see an “ArcGIS” folder in the “Program Files” folder, you may need to reinstall ArcGIS Pro for all users.
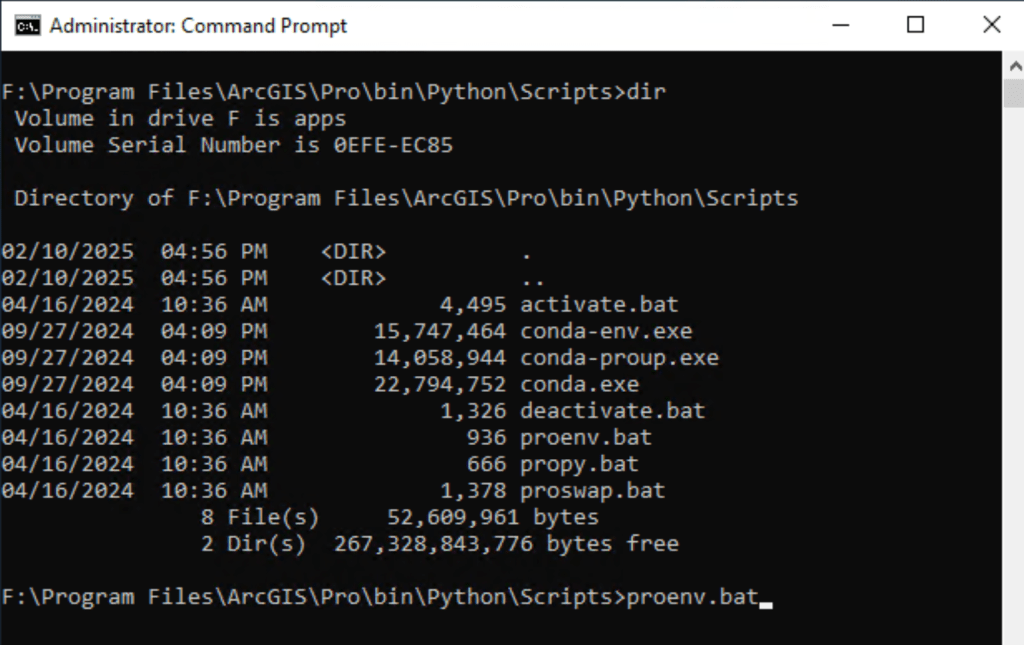
When proenv.bat is run, the Conda command line tools are made available in the default ArcGIS Pro Python environment. From there, navigate to the folder containing the cloned ArcGIS Pro Python environment made for the flask-demo app with command activate arcgispro-py3-flask-demo
With the cloned environment activate, add two dependencies: flask and wfastcgi. The flask package will install the framework base library; there are additional flask packages which add more features the the framework, but to get started all we need is this package. Wfastcgi provides a bridge between IIS and Python using WSGI and FastCGI; Web Server Gateway Interface (WSGI) is a standard way for web servers to communicate with Python web applications, and FastCGI is a protocol that allows web servers to communicate with external applications.
conda install flask
conda install wfastcgi
Once those dependencies are satisfied in the cloned ArcGIS Python environment, file “wfastcgi.py” needs to be copied from the cloned Python environment’s site-packages folder here:
C:\inetpub\wwwroot\flask-demo\arcgispro-py3-flask-demo\Lib\site-packages\site-packages\wfastcgi.py
to the root application folder here:
C:\inetpub\wwwroot\flask-demo\wfastcgi.py
Once that is complete, launch the IIS manager. In there, you will see your server and any websites running on it. On my server, I have the default website (which is currently not running) and a site bound to my url; I’m excluding the url name in screenshots as I don’t actually have the Flask demo app deployed to this server; these images are just for visual reference.

Select “Application Pools” and click “Add Application Pool…” setting the Name to “flask-demo”, the .NET CLR Version to “No managed code”, and Managed pipeline mode to “Integrated.” Click “OK” and then open the “flask-demo” application pool’s advanced settings and under Process Model > Identity select option “Custom account” and enter your account name and password (this should be the same service account with which you are logged into the server, and with which you have also launched ArcGIS Pro.

The next step is to set some ownership permissions on the application folder so that the IIS app pool we created can execute files contained within. Right click the “flask-demo” folder in “C:\inetpub\wwwroot\” and select Properties > Security > Advanced. At the top of the dialog box, next to “Owner” click “Change.”

In the “Select User…” dialog box, set the location to your server, set “Enter the object name to select” to “IIS AppPool\flask-demo”, click “Check Names” to verify the user is correct. Click OK to return to the Advanced Security Settings dialog box, ensure “Replace all child object permission…” is checked, and click “OK.” This operation will set the owner of the “flask-app” folder and all files & folders contained within to the app pool username.
Back in IIS, select your server, then open “Fast CGI Settings”

Click “Add Application…” and set “Full path” to the python.exe interpreter in the cloned ArcGIS Pro Python environment:
C:\inetpub\wwwroot\flask-demo\arcgispro-py3-flask-demo\python.exe
And set “Arguments” the location of the wfastcgi.py file we copied to the root app folder earlier:
C:\inetpub\wwwroot\flask-demo\wfastcgi.py
All other settings under “Add Application” can be left as default.
Finally, the web.config file copied to the root application folder from the flask-demo repository needs to be edited to include the paths specified above. In the <handlers> section, set “scriptProcessor” to the python.exe path and wfastcgi.py path, separate by a vertical bar. Additionally, in the <appSettings> section ensure two keys are present: “WSGI_HANDLER” should be set to “app.py” and “PYTHONPATH” should be set to the root app folder, “C:\inetpub\wwwroot\flask-demo”.
Here is what the contents of web.confg should look like:
<?xml version="1.0" encoding="utf-8"?>
<configuration>
	<system.webServer>
		<handlers>
			<add name="Python FastCGI" path="*" verb="*" modules="FastCgiModule" scriptProcessor="C:\inetpub\wwwroot\flask-demo\arcgispro-py3-flask-demo\python.exe|C:\inetpub\wwwroot\flask-demo\wfastcgi.py" resourceType="Unspecified" requireAccess="Script" />
		</handlers>
        <httpErrors errorMode="Detailed">
            <remove statusCode="500" subStatusCode="-1" />
        </httpErrors>
	</system.webServer>
	<appSettings>
		<!-- Required settings -->
		<add key="WSGI_HANDLER" value="app.app" />
		<add key="PYTHONPATH" value="C:\inetpub\wwwroot\flask-demo" />
	</appSettings>
</configuration>
After this final step, restart IIS and the application should be up and running! Verify this by making HTTP requests to the /hello endpoint and verifying the expected message is returned in the response. Additionally, make requests to the /checkArcPy and /checkArcGISPythonAPI endpoints, ensuring they both return the expected responses indicating the arcpy and arcgis packages were imported and can call methods within each library.
Feel free to comment here with any questions you may have or any errors you are experiencing and I am glad to help troubleshoot!

Error occurred while reading WSGI handler: Traceback (most recent call last): File “C:inetpubwwwrootflask-demowfastcgi.py”, line 791, in main env, handler = read_wsgi_handler(response.physical_path) ^^^^^^^^^^^^^^^^^^^^^^^^^^^^^^^^^^^^^^^^^ File “C:inetpubwwwrootflask-demowfastcgi.py”, line 633, in read_wsgi_handler handler = get_wsgi_handler(os.getenv(“WSGI_HANDLER”)) ^^^^^^^^^^^^^^^^^^^^^^^^^^^^^^^^^^^^^^^^^^^ File “C:inetpubwwwrootflask-demowfastcgi.py”, line 600, in get_wsgi_handler handler = __import__(module_name, fromlist=[name_list[0][0]]) ^^^^^^^^^^^^^^^^^^^^^^^^^^^^^^^^^^^^^^^^^^^^^^^^^^^ File “C:inetpubwwwrootflask-demoapp.py”, line 2, in <module> import arcpy File “C:Program FilesArcGISProResourcesArcPyarcpy__init__.py”, line 77, in <module> from arcpy.geoprocessing import gp File “C:Program FilesArcGISProResourcesArcPyarcpygeoprocessing__init__.py”, line 14, in <module> from ._base import * File “C:Program FilesArcGISProResourcesArcPyarcpygeoprocessing_base.py”, line 14, in <module> import arcgisscripting File “C:inetpubwwwrootflask-demoarcgispro-py3-flask-demoLibsite-packagesarcgisscripting__init__.py”, line 131, in <module> from ._arcgisscripting import * RuntimeError: The Product License has not been initialized. StdOut: StdErr:
After I able to run successfully in my local but i try to put into my local IIS. It come out this error. I already follow the step in the IIS hosting part. You have any solution on this?
LikeLike
This looks related to the issue I described where the account under which the IIS app pool is running has never opened ArcGIS Pro. Are you able to log into the server with that account and open ArcGIS Pro? That may resolve the issue.
LikeLike
I understand that running
proenv.batis necessary when setting up the environment locally. Is there a similar requirement when deploying the application to IIS? Cause i don’t see the related stepsLikeLike